Photoshop Tutorial: Reflection in four easy steps.
If the old adage, “if it's on the internet, then it's true”, is to be believed, then we can safely assume that today, reflections are the new drop shadows.
Okay, okay. Back to serious talk. Reflection is great, but like pretty much everything else in this world, it would bring no good when overused. Personally, I love this effect, so use this technique wisely and don't let it be the next lens flare.
Please.
First, you will need to duplicate the layer that contains your object. The keyboard-free way to do this is via the Layers subwindow: find the layer to duplicate, and drag it to the little 'Create a new layer' at the bottom of the subwindow. The mouse-free way is to choose the layer, then press Ctrl+J (or Layer > New > Layer Via Copy).

Here, my object is a star. The gradient background is irrelevant. Now, I have duplicated my star, but since I haven't done anything with it, the duplicate remains right on top of the original star, and therefore only one star is shown.
Second, flip vertical the duplicate layer we just created few seconds ago. To do this, Edit > Transform > Flip Vertical. Next, pick the Move Tool (press V), and drag the duplicated object several pixels down, until it is located right below the original object.

Now, it looks more like a reflection already. If this is what you want, you can leave now. But the rest of you, follow through.
Third, we want to make the reflection be a bit more transparent, because currently it looks like we're placing our object on top of a mirror. To do this, add a layer mask to the reflection's layer. The easy way is to click the little 'Add a mask' button on the Layers subwindow. The more boring way is Layer > Add Layer Mask > Reveal All. If you're doing okay, you should that the layer now shows something like this (notice the arrow):

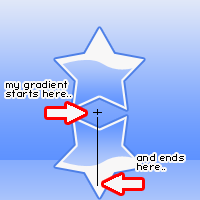
Fourth, pick the Gradient Tool (press G, but it may also show Paint Bucket Tool, so use your mouse to pick the Gradient Tool if that happens). Make sure the selected item on the Layers subwindow is the Layer Mask we just created (if you didn't mess around with the Layers subwindow after we add the layer mask, everything will be fine). Now, pay attention. Your job is to make a vertical gradient, from the topmost area of the reflection object, down about half of the object size. This is merely a matter of need and taste, though. Play around with the Gradient (just use Undo over and over). The general idea is to make the gradient from top to bottom.
Ta-da. The result would be as follow:

Now this is what I'm calling a reflection. We're done. As an bonus step, you can alter the Opacity of the reflection. This is what happened when I set the Opacity to 45%:

Looks better to me, but of course it would depend on the effect you're trying to achieve. Anyway, that's it. I hope you find this tutorial helpful. Enjoy!
Comments & Discussion
Post a Comment
 back to top
ARCHIVES

